Custom Search
|

|
|---|
|
|
|---|
|
|
|---|
|
Custom Search
|
|
|---|
Recommended for developers:

![]()
Lesser Goldfinch family preening
![]()
LCD Vs. CRT - Do LCDs finally match CRTs in picture quality?
ECS P965T-A Motherboard
ABIT AN8 SLI Motherboard
Foxconn 975X7AB-8EKRS2H Motherboard
Foxconn BlackOps Motherboard
![]()
My misadventures flying with Allegiant Air
![]()
The Missing Post Mystery
A post I made to a Vista newsgroup was missing from the Outlook newsreader
Where did it go?
The Missing Post Mystery Revisited
It happened again! A post I made to a Vista newsgroup was missing from the Vista Mail newsreader
Where did it go?
A Case of Maxtaken Identity
When is a hard drive not a hard drive? Find out when!
![]()
Changes to the Windows 7 Taskbar You Should Know About
Vista Image Capture 'Slipstream' SP1 and SP2 into a single Vista install disc
Detailed Instructions for Reverse Integrating SP1 and SP2 into Vista
What is RAID? Some RAID Basics
RAID 5 on a Desktop PC
How to Personalize Windows Vista
Develop and Implement a Personal Backup Plan
Ten things you can do to create better documentation
(Tech Republic)
Flash Your BIOS
Three Good Reasons for Flashing Your BIOS
Ten common mistakes you should avoid when flashing your BIOS
(Tech Republic)
Find a new dial-up ISP
Sign up for 10 free hours of NetZero access!
Create a Shutdown/Sleep/Restart or Continue Icon For the Vista Desktop
What is a computer guy doing with home remodeling projects on his Website?
The Upscale Utility Room Remodel with Catch Basin and Wraparound Ceramic Tile Wall
The Bathroom Remodel for Under $1000 Project
The Do It Yourself Bedroom Engineered Prefinished Red Oak Wood Flooring Installation From Hell
Bedroom Remodel With Wood Parquet Flooring
Use Comodo Internet Security 4.0 to Lock Down Your PC Following a Windows Install or Reinstall
![]()
The Northstar Horizon Microcomputer
![]()
Round-Tailed Ground Squirrels

Prairie Dogs

American Kestrel Falcons "Sparrow Hawk"

Arizona Sonoran Desert

Arizona Sunsets

Cienega Creek

Trains In the Desert

Desert and Mountain Flowers

Fox Squirrels

![]()
The Other Reason Why Your Irrigation Valve Might be Leaking
My Response to the Newegg Affiliates Program Changes
Playing the Rebate Game
Know the Rules Before You Play
Vista Confusion
The four questions you need to ask before buying Vista
Buying The Components For Your First PC Build
Caveats:
I am an admitted hardware novice, or at least I was when I started this project. I have three somewhat 'esoteric' operating systems that I wanted to run multiple boot, Windows NT 4.0, XP Professional x64 and Vista Beta 2. I am in the process of evaluating a replacement operating system for NT 4.0. There is limited driver support for XP Pro x64 and Vista and some 32 bit programs just won't run in XP Pro x64 and Vista Beta 2. ABIT also clearly stated to me via E-mail that NT is NOT supported (no NT driver support for the AN8 SLI). I decided to try to install NT 4.0 anyway when XP Pro x64 wouldn't load.
These notes are not guaranteed to be 100% accurate, but are what I think I experienced getting this board to work with these three operating systems.
My PC was getting old, really old. I bought a Micron 450 MHz Pentium II PC in 1998 for $1800. By today's standards, that would get you a top notch computer and that is exactly what a 450 MHz Pentium II PC was back in 1998. It was a good PC and purchase, for it has lasted nearly eight years of heavy daily use in very warm conditions. Only the back panel fan had to be replaced, though I lived with a noisy power supply fan for longer than I care to admit.
One day in April 2006, my Maxtor Pulsar 13.6 GB hard drive finally started to die. It had a design life of five years and my experience with PC's in the past led me to purchase a replacement over a year ago. I left the Maxtor drive in the system and used it daily knowing that it was well past the normal expected life of most hard drives. It lasted about seven and a half years, quite unexpected considering my environment and usage.
On a whim, I sent a somewhat amusing 'Product Reliability Report' to the PR people at Maxtor in the form of an obituary for my friend 'Max' (see Maxtor DiamondMax 10 300 GB ATA Hard Drive 6B300R0) who met his demise via advanced sudden Alzheimer's onset. To my surprise and utter astonishment, they offered to send me a replacement for my friend Max. It arrived Fed Ex in two days and was one of their top of the line 300 GB Diamond Max 10 ATA drives! Wow, that was generous, to say the least. Thank You Maxtor!
I decided with the arrival of the Maxtor 300 GB hard drive that it was time to get a new computer. My brother had been nagging me to get a new PC but I have kept putting it off since I am of the firm belief that you don't buy any computer hardware until you absolutely have to. That decision was really a blessing in disguise, I had finally found a project that I could really get excited about, and it all started with the demise of poor Max! Rest in Peace little buddy!
I have done more than two weeks of intensive research on what to buy. I could not find a pre-built computer with all of the features that I wanted at a great price. I looked at the 'barebones' kits that are usually nothing more than a case, motherboard, CPU and power supply, but found them lacking for the same reasons. Because of this, and because I have a list of hardware items that I can scavenge off of my old computer, I decided to build one myself.
Here is what I have learned; it might be useful to you if you want to buy a new computer - these are my suggestions anyway.....
Do your research! Take as much time as you need to decide on exactly what kind of features and components you want. You can usually send an item back with prior authorization, but why put up with all the hassle and potential restocking fees. You should put in as much time doing your research as you need until you feel comfortable with your choices.
Don't buy high-end components for some of the components and low-end components for others. Lower end components are fine if you want to go that route, though you will probably be sacrificing reliability and speed, just try to match up the lower end components with similar components. It just doesn't make any sense to put a fast CPU in a system with slow memory and front side bus.
Buy a motherboard from a top vendor with the features you want. The top five vendors seem to be ASUS, DFI, MSI, ABIT and Gigabyte. Don't skimp on the motherboard, but if you can find a board with the features you want from a good vendor at a good price, gopherit! Consider 'future-proofing' as much as possible based on what you MAY be doing on your computer in the future and where the PC world seems to be heading. Right now, that direction is SLI (Scalable Link Interface) video.
Decide on AMD or Intel. AMD if you are doing multimedia or gaming and want the fastest CPU and Intel for non-CPU intensive use. Avoid the top of the line CPU's. Develop a plan to upgrade the CPU and buy the lowest priced CPU to handle your current needs and still satisfy the very human need for power. Consider 'futureproofing' here as well. The PC world and CPU vendors are definitely headed toward dual core. It is important to know what socket type the vendors are building and may continue to build for. In the case of AMD, that is socket 939. It supports 64, 64x2, and FX CPU's. Dual core CPU prices should fall dramatically when Intel releases their new processors later in 2006.
The key here is ventilation, especially if you are buying mid-range or top-end video cards. Keep your power hungry chips and boards cool. Buy a case that is the right size for you, has sufficient quiet fans (120 mm fans move more air at slower speeds and are therefore quieter), has the number of external and internal bays you expect to need, has the connectors you want on the front panel, matches your motherboard for the number of card slots AND onboard fan connectors and is aesthetically pleasing. Be aware that some cases come with clear side panels, blue LED fans and/or front panel displays that can be really annoying (or cool depending on your tastes) in a darkened room. Avoid cases that have sharp edges. Buy a quality case that has these edges folded to avoid cutting yourself. You might be surprised how often you will be putting your hands inside the case, pulling and prying out cards, drives, etc.
Cooling is important here also. A power supply with one 100 mm fan or two 80 mm fans is probably a better choice than one with only one 80 mm fan. If noise is a concern, there are fanless units making their way to the market, but their wattage is typically lower and reliability unknown. I decided on a dual rail design which theoretically provides cleaner power to the CPU. The CPU is on one +12 volt line and the other devices are on another +12 volt line. Buy a PSU with high efficiency, greater than 70%. If you will be buying mid-range or top-end video cards, be sure check the power requirements provided by the vendor. In general, the better video cards require PSU's in the 500 watt range. One other consideration is sheathed cabling and modular cabling. Sheathed cabling keeps the bundle of cables in a clean smaller space allowing for better airflow in the case. Modular cabling allows you to plug in and unplug any unused cables - a very neat, but expensive design. Be sure the power supply has sufficient power cables for all the devices that you expect to buy over the life of the computer.
The PSU I bought is 500 watts, >70% efficiency, 2 blue led 80 mm fans, and a manual variable fan control. The cabling is sheathed and it has a nice aluminum case.
Rule number one: buy the right memory for your CPU/Motherboard! Your motherboard specs will state the number of pins for the SDRAM modules, that is 184 for most AMD ATX motherboards. Buy the fastest memory you can, but avoid bargain RAM. For AMD systems that is DDR 400 MHz PC3200. The reviews I have read say Corsair is the premium memory now, at least for AMD where I did all of my research. I also noted that most hardware reviewers use Corsair RAM in their tests. Most motherboards come with four RAM (DIMM) slots and support either 4 or 8 GB. Don't buy 512 GB SDRAM's if you want to max out your RAM. Also, buy the SDRAM in pairs to take advantage of dual channeling and to keep the memory 'matched'.
Back To Top
First Boot-up � The first boot-up failed. The POST LED readout told me where it stopped but not why. I finally discovered that one or more IDE devices were not detected by the BIOS. It was confusing because the number of undetected devices changed. One device consistently failed to be recognized, a twelve year old Mitsumi CD-ROM drive. I can't be too critical about that, after all the CD-ROM is 120 years old in human years! Time to bury it I guess. I unplugged it and the board booted up. I knew there were issues that people had with this board from reading the reviews at Newegg.com, but I had decided that if I could just get the motherboard to boot-up I would be committed to make it work.
I then tried to load XP Professional x64. I inserted the CD-ROM and rebooted the system. The blue Windows setup screen came up and the initial files were loaded. At the point in the setup where the status panel showed 'Starting Windows', the system rebooted after ten to fifteen seconds. I tried disconnecting devices, changing BIOS settings - especially the IRQ settings, different video cards and removing cards. I thought I had an IRQ conflict or a problem with the video card. I finally gave up temporarily after finding no information at the Microsoft knowledge base.
I noticed by accident that Windows NT would load. I installed NT and began using it. To my complete dismay and befuddlement, NT was slower than my old computer! How could that be? I continued to use NT for several days, thinking that it might be a PCIe video card problem since the NT drivers from eVGA did not have my exact model, but a similar one. I eliminated that possibility by switching video cards. I then tried a lot of different settings within the BIOS, and concentrated on the IRQ settings when I noticed in the POST screen that the display adapter shared an IRQ with another device. I found a way to give the display adapter it's own IRQ, see Suggested BIOS Settings, but NT was still slow.
While using NT, I spent a few hours each night trying to resolve the XP Pro x64 install problem. After a few days, I was resolved to resolve this problem and concentrated on it with a vengeance! I had tried disconnecting or swapping out every device, but forgotten the external devices. I disconnected the USB device, a printer connected via a USB to parallel cable, and the problem was magically fixed. I now know that the problem was with the BIOS support for the USB port. I had disabled the USB support in the BIOS to simplify my IRQ setup, but left the USB device plugged in. Apparently the BIOS didn't really disable the USB port because the Windows setup failed. I believe that the reason that NT would load is because it has no USB support. I also found that the USB support could be enabled in the BIOS with the same successful resolution. The XP Pro x64 setup finally actually did start Windows! While loading XP Pro x64, I noticed that the initial estimated install time was 39 minutes. No problem, I
thought. The install took about four hours, big problem. I knew there was something seriously wrong and I guessed it was a problem with a BIOS setting (insert big smiley here!). I had changed just about every BIOS setting that I could, at least the ones that made sense to change. I finally tried disabling the 'DMA Transfer Access', not knowing what that was but figuring that I hadn't changed it yet and another magical thing happened, the computer became a real speed demon! See Problem Resolutions.
Back To Top
Download
But I did get some of it wrong. I had tried to play super computer tech at first boot up. Every single device I planned to use was plugged in and ready to go, assuming of course that I had made all the right connections to the motherboard and configured all the right settings in the BIOS. I had done a good job with the connections, forgetting only the floppy drive power connection and getting the case hard disk LED and power LED connections backward. Even knowing that there might be BIOS problems, I plunged ahead full steam with a very complicated system. I might have gotten away with that with a more robust BIOS, but I would never do it again that way, especially for an ABIT motherboard.
I would do it a lot differently the second time around, connecting only the minimum number of devices needed to boot up the computer and then add one device at a time to narrow down any possible BIOS issues.
I would also do a lot more research on the web for building a PC and for explanations of the advanced BIOS settings.
Back To Top
Update August 11, 2007. This computer was a given as a gift to my dad for his 50th wedding anniversary. It has been more than ten months since I sent this system to him. I was visiting my parents and had a firsthand chance to revisit some of the issues that I had during the initial build but failed to include in this review. I have added items 4-6 in the problem resolution summary list above.
I am more experienced with hardware now and I was able to quickly recognize and solve these problems that I had seen before. I now know that these problems were not errors I made, but system/BIOS specific problems with the ABIT AN8 SLI motherboard. I had printed out some BIOS screen shots taken with a digital camera and it was a simple five minute task to clear the CMOS and reconfigure the BIOS. If you own this motherboard, it is a good idea to do take pictures of the BIOS screens and print them out for future reference. It sure made my job a lot easier to get the PC working quickly and correctly the first time. You can alternatively print out this article and/or the pictures of the BIOS screens and make notes of your different BIOS settings to match your system components.
Once you have your BIOS settings configured properly, it is a good idea to create and save a new profile in the BIOS. This profile can be loaded with all of your BIOS settings after clearing the CMOS and save you the time and trouble of manually changing all of those BIOS parameters.
See ThermalTake VA3000BWA Aluminum Case for a discussion of the problems encountered from the shipping of the computer.
While trying to configure the manual settings on a Samsung LCD monitor during POST, the 300 GB Maxtor IDE drive with an IDE to SATA converter failed to be recognized. I got a Disk boot error and after rebooting and looking in the BIOS, the drive was not recognized. Clearing the CMOS, resetting the BIOS values and rebooting the computer solved this problem.
Let me just say it now that I am a little more experienced with hardware. As configured, the ABIT AN8 SLI BIOS is flaky - not a lot, but enough to cause grief for the owner.
Since moving my Web site to pecos-softwareworks.com at Dot5Hosting I have been able to view the statistics of who is visiting this web page. First, let me thank you for visiting my web site. I find it interesting the number of hits on this web page considering the age of the ABIT AN8 SLI motherboard. I have added this update after noticing the number of searches on exactly the kind of problems I experienced after my reconfiguration of this system.
Back To Top
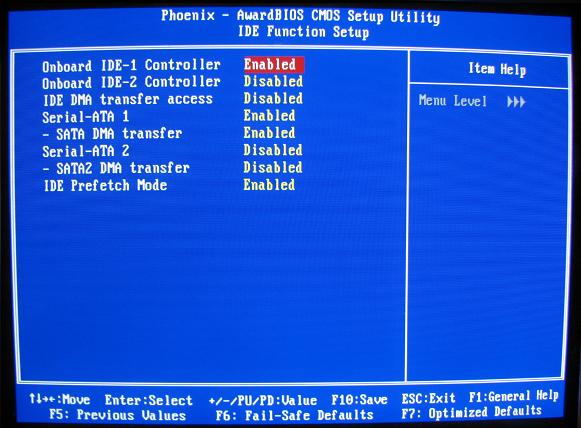
IF you have CD ROM drive(s) on IDE channel two:
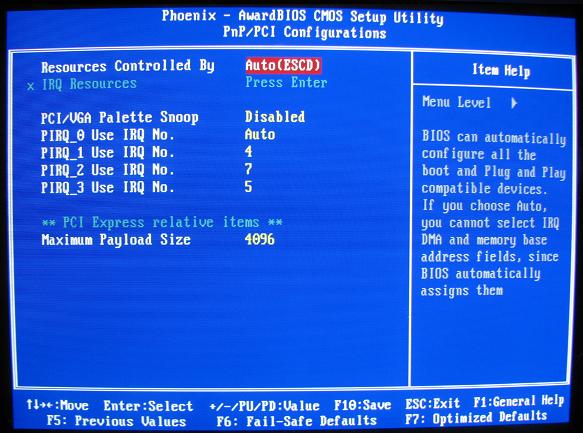
The Advanced Chipset Features:
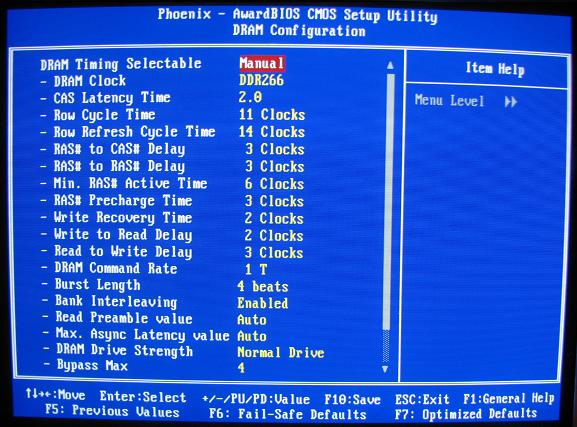
The following manual memory settings are for DDR400 2-3-3-6 timing memory modules:
Back To Top
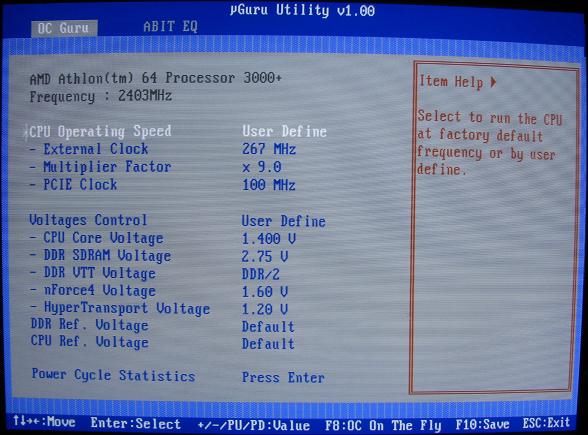
I finally have gotten around to figuring out how to overclock this motherboard. In short, I will show you the BIOS settings that I used.
Use these values on your system at your own risk!
I do not claim these settings to be optimal; my only goal was to get stable performance with reasonable CPU overclocking.
Micro Guru Settings
I added a little bit of voltage to the DRAM since the Corsair memory I am using is tested at 2.75 Volts. The Northbridge was bumped up .10 Volts. The system seems to be stable with these settings and a 33% increase in the CPU frequency is quite acceptable, especially for a first try at overclocking.
Back To Top
I really like this motherboard. It has a lot of almost state of the art features at a great price, and it is the price I like the most, being on a budget. Now you might think with all of the cons listed that I wouldn't, but those cons are mostly BIOS issues that go away once you configure the BIOS properly.
If you have installed a motherboard before or really know your way around the BIOS and are using new components, you shouldn't have many problems. If you have a below average knowledge of BIOS settings, you could still buy this board if you make the time and energy commitment to make it work. The actual hardware installation is actually pretty easy and even almost fun. Take your time and follow the instructions in the manual, they are very good.
While I don't recommend running any of the operating systems that I am, NT 4.0, XP Professional 64 bit and Vista Beta2 64 bit, all will run well if you want to do without audio support, USB support, MicroGuru, RAID support and the other utilities that come on the ABIT CD-ROM in NT and MicroGuru and some of the other utilities that come on the ABIT CD-ROM in XP Pro x64. Vista is still very much in Beta mode as of this date and I have been able to install only a few of my XP x64 drivers and software.
Who shouldn't buy this board?
If you don't know your way around the plethora of BIOS settings in the Award Bios and don't want to know, this board isn't for you.
If you are an extreme gamer and want to buy two of those fire breathing video card furnaces out there on the market now, this board isn't for you. One high performance video card should work well, but that isn't why you buy an SLI motherboard in the first place.
If you have two different PCIe cards, this motherboard isn't for you either.
Lessons Learned
Pros / Cons
Problem Resolutions
Suggested BIOS Settings for the ABIT AN8 SLI
Overclocking the ABIT AN8 SLI
Conclusions
My System
Buying the Components tor Your First PC Build
Prepare, Prepare, Prepare!
Match Your Components
Motherboard:
CPU:
Case:
Power Supply:
RAM:
Turn It On Again and Again and Again..... And The BIOS Setup - The Ugly Color Play By Play
Lessons Learned
I did get a lot of it right. I spent ample time researching the components, I matched them up well with each other and my operating systems, I ordered the parts at the best possible price including mail in rebates, I even developed an upgrade plan in an Excel spreadsheet. I took my time putting the components together double and triple checking them.
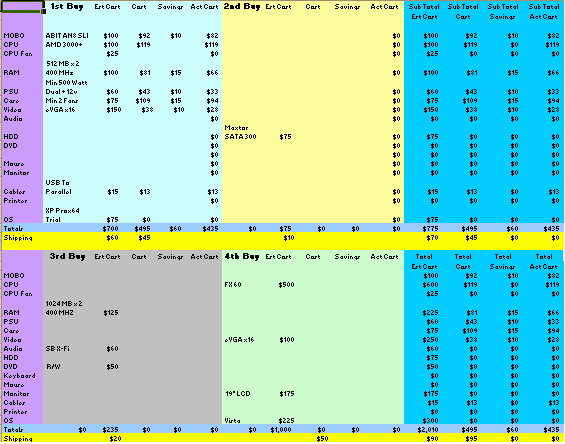
ID
Component
Details
Reviews
1
ABIT AN8 SLI Socket 939 NVIDIA nForce4 SLI ATX AMD Motherboard - Discontinued (See The AN8 32X Version)
Similar Board At Newegg
.
2
AMD 3000+ 64 CPU
Tiger Direct
My Review
3
CORSAIR XMS 1GB (2 x 512MB) 184-Pin DDR SDRAM DDR 400 (PC 3200) CAS Latency 2 timing 2-3-3-3-6
Newegg
My Review
4
eVGA 128-TC-2N27-SX Geforce 6200 LE TC Supporting 512MB (On board 128MB) 64-bit DDR PCI Express x16 Video Card
Newegg
My Review
5
Maxtor DiamondMax 10 300 GB ATA Hard Drive 6B300R0
Maxtor
My Review - And Thank You Maxtor!
6
Seagate Barracuda 30GB ATA Hard Drive ST330013A
Seagate Specs
8
NEC ND3550A / 16x8x16x DVD+RW / 16x6x16x DVD-RW / 8x DVD+R DL / 6x DVD-R DL / 48x32x48x CD-RW / Black / Dual Layer / Retail Box DVD Burner with Software
Tiger Direct
7
Teac CD R/W 4x4x32 CD-W54E
Teac Specs
9
Unknown 1994 Floppy Drive
Scavenged from my twelve year old Zeos PC
10
3Com Coyote internal PCI 56 KBs Winmodem (for NT 4.0)
Scavenged from my seven and a half year old Micron PC
My Review
11
Hiro 56K V.92 PCI Modem S/W W/O Voice Intel 537EP Chip 56 KBs Modem (For XP Pro x64)
Tiger Direct
My Review
12
Rosewill RE502-SLV ATX12V 2.01 500W Aluminum Power Supply with 2 x 80 mm blue LED fans
Newegg
My Review
13
ThermalTake VA3000BWA Aluminum Case with 1 x 120 mm blue LED, 1 x 120 mm and 1 x 90 mm fans
Newegg
My Review
14
GWC USB to Parallel Cable (Bi-Directional) Model 80000 � OEM
Newegg
My Review
Problem Resolution Summary
Suggested BIOS Settings
These settings work well for me, your mileage may vary!
Repeat the above three items if you have a slave drive in the Standard CMOS Features=> IDE Channel 1 Slave menu.
Verify that the IDE Controllers are enabled. Sometimes they are disabled when changing devices. This is done in the Integrated Peripherals => IDE / RAID Function => IDE Function Setup => Onboard IDE-1 Controller' menu item in the BIOS

Overclocking For The ABIT AN8 SLI
CPU Clock Value
Multiplier
DRAM Voltage Select
Northbridge Voltage Select
CPU Clock
DRAM Clock
267
x 9.0
+.15 V
+.10 V
2403
266
Conclusions
Who should buy this board?
Pecos SoftWareWorks Home
Contact Me
Terms of Use Rev 09/30/10
Privacy Policy Rev 05/20/09
About Us
Site Map
Tweet
© Copyright 2007-2015 Alan Norton
None of the content may be used or reproduced without written authorization from Alan Norton.