
Custom Search
|

|
|---|
|
|
|---|
|
|
|---|
|
Custom Search
|
|
|---|
Recommended for developers:

![]()
Lesser Goldfinch family preening
![]()
LCD Vs. CRT - Do LCDs finally match CRTs in picture quality?
ECS P965T-A Motherboard
ABIT AN8 SLI Motherboard
Foxconn 975X7AB-8EKRS2H Motherboard
Foxconn BlackOps Motherboard
![]()
My misadventures flying with Allegiant Air
![]()
The Missing Post Mystery
A post I made to a Vista newsgroup was missing from the Outlook newsreader
Where did it go?
The Missing Post Mystery Revisited
It happened again! A post I made to a Vista newsgroup was missing from the Vista Mail newsreader
Where did it go?
A Case of Maxtaken Identity
When is a hard drive not a hard drive? Find out when!
![]()
Changes to the Windows 7 Taskbar You Should Know About
Vista Image Capture 'Slipstream' SP1 and SP2 into a single Vista install disc
Detailed Instructions for Reverse Integrating SP1 and SP2 into Vista
What is RAID? Some RAID Basics
RAID 5 on a Desktop PC
How to Personalize Windows Vista
Develop and Implement a Personal Backup Plan
Ten things you can do to create better documentation
(Tech Republic)
Flash Your BIOS
Three Good Reasons for Flashing Your BIOS
Ten common mistakes you should avoid when flashing your BIOS
(Tech Republic)
Find a new dial-up ISP
Sign up for 10 free hours of NetZero access!
Create a Shutdown/Sleep/Restart or Continue Icon For the Vista Desktop
What is a computer guy doing with home remodeling projects on his Website?
The Upscale Utility Room Remodel with Catch Basin and Wraparound Ceramic Tile Wall
The Bathroom Remodel for Under $1000 Project
The Do It Yourself Bedroom Engineered Prefinished Red Oak Wood Flooring Installation From Hell
Bedroom Remodel With Wood Parquet Flooring
Use Comodo Internet Security 4.0 to Lock Down Your PC Following a Windows Install or Reinstall
![]()
The Northstar Horizon Microcomputer
![]()
Round-Tailed Ground Squirrels

Prairie Dogs

American Kestrel Falcons "Sparrow Hawk"

Arizona Sonoran Desert

Arizona Sunsets

Cienega Creek

Trains In the Desert

Desert and Mountain Flowers

Fox Squirrels

![]()
The Other Reason Why Your Irrigation Valve Might be Leaking
My Response to the Newegg Affiliates Program Changes
Playing the Rebate Game
Know the Rules Before You Play
Vista Confusion
The four questions you need to ask before buying Vista
The Hunt Is On
Motherboard Layout and Overview
Pros / Cons
Lessons Learned Or Stupid, Stupid, Stupid
Problem Resolution
Want Speed And Data Safety? Consider RAID
Editorial Privilege
Notes And Comments From Foxconn Technical Support
Conclusions
My System
Caveats: I am now only slightly better than a hardware novice. This is only my third PC build, but don't let that scare you off! You may just find a few nuggets here and I have tried to make it a fun read. This is certainly not your typical review. I have tried to place emphasis on helpful information, especially for the many people out there who have decided to build their own computer for the first time.
These notes are not guaranteed to be 100% accurate, but are what I think I experienced and learned building my second Intel based Core 2 Duo Vista ready PC.
After the return of the ECS P965T-A, see The ECS P965T-A Challenge, I was on the hunt again for another motherboard. I had one constraint that had to be considered; the motherboard had to fully support my OCZ Platinum DDR2 800 memory. I spent quite a few days and nights reading online reviews, customer reviews and spec sheets. What I saw was very discouraging. Almost every motherboard regardless of price had major issues and most of them were with RAM compatibility. The more I read, the more discouraged and confused I was getting. I was beginning to think that I should have lived with my 800 MHz RAM running at 533 MHz and been happy. But, no! I must press onwards!
I realized that to clarify the choice, I needed to put on paper my requirements and match them against the vendor specs. I found a web-site that had good detailed specs, eWiz.com and went to work. One of the important pieces of information that I found in their specs was the true number of channels for the SLI slot(s). I consider this a vital piece of information that is often glossed over at most retail sites.
Fortunately, I decided to research some other online sites other than my favorite two. I found a Foxconn motherboard at eWiz.com that seemed interesting, but Foxconn wasn't on my list of top five manufacturers and the model I was interested in wasn't even listed at Newegg. Why Not? It had been. A little research into Foxconn revealed that they have been making motherboards for years, but have just recently gotten into the direct to home market. Other research showed that a large group of extreme overclockers had purchased this motherboard en-masse from Newegg and many had returned it, because like all other Core 2 Duo they had tested, it had disappointed them. Maybe this is why it was no longer at Newegg? I wasn't concerned about extreme overclocking and the board fascinated me enough that I left it on my list. I'm glad I did.
I also chose some other motherboards that had intrigued me. They had to be Intel Core 2 Duo ready of course. I decided that a spreadsheet, as much as I dislike them, was a good place to put the information. As I put it together, I organized it from left to right by high to low price with each column representing a motherboard. My requirements were listed from top to bottom in order of most to least importance. A picture is better than my ramblings:
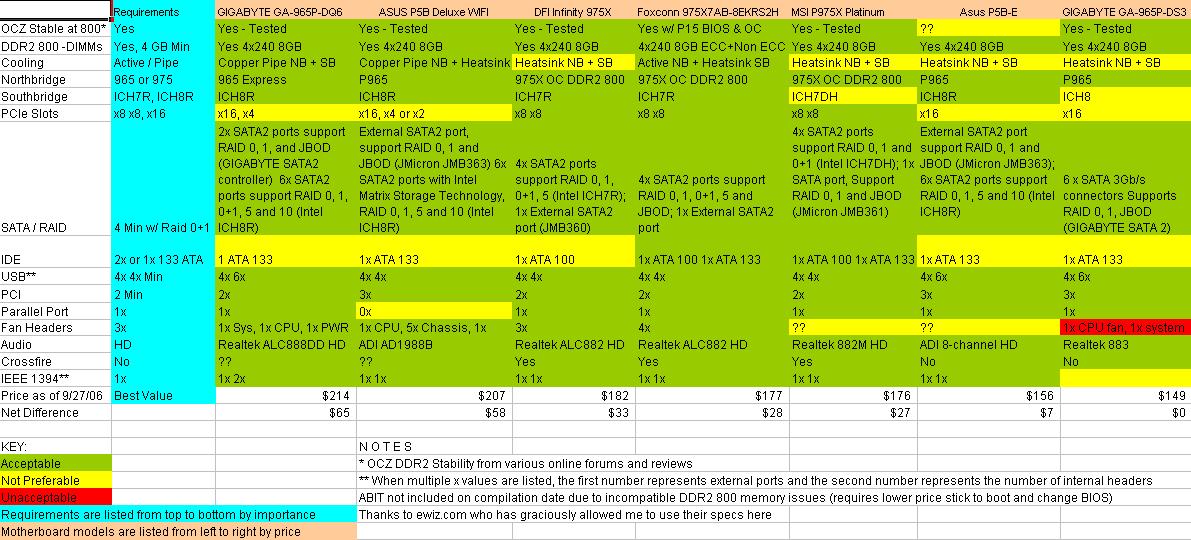
I colored the cells according to their fit to my requirements, green - acceptable, yellow - not preferable and red - unacceptable. I put ?? in the cells that needed more research. It quickly became apparent that the Foxconn fit my requirements best. Of course, you should download the spreadsheet yourself and change the priorities and add or delete to your heart's desire. When you are done, you should have a pretty clear picture of the motherboards to concentrate on. For the speed demons and overclockers out there, you would definitely want to add some rows for performance and BIOS settings. It isn't a priority to me now.
I ordered the Foxconn from eWiz. It shipped the same day and soon I received it and was ready to see what I had here.
Thanks to eWiz for allowing me to post their motherboard specs.
I got some of the OCZ DDR2 800 compatibility information from the Bleedinedge Forum - OCZ DDR2 800 Motherboard Compatibility List.
Back To Top
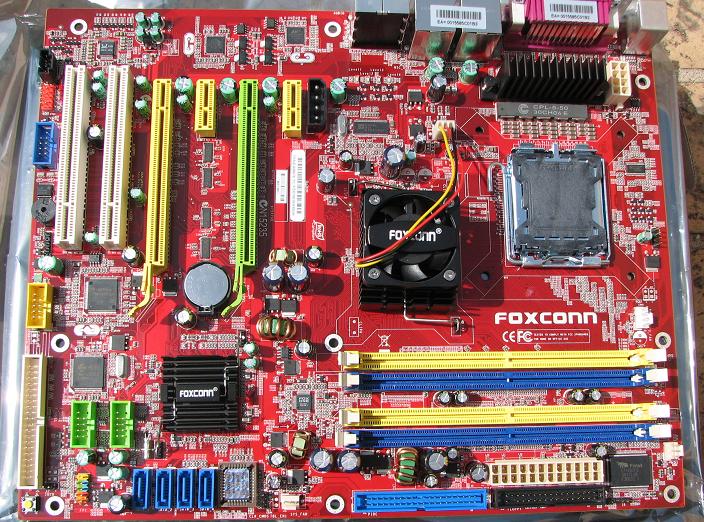
The layout itself is excellent with only a few minor issues. The power connector for the PCIe cards was above the PCIe slots and by the back I/O ports. I didn't want to route the power cable over the middle of the motherboard or around the power supply section of the motherboard where cooling was important. The Rosewill power supply I had purchased had a four pin Molex cable that was long enough to reach all the way around the bottom of the motherboard, under the PCIe card and up to the connector. See Building The Foxconn 975X7AB-8EKRS2H PC for a picture of the routing.
There was no fan header by the I/O port side of the motherboard. Foxconn doesn't recommend that large case fans be connected directly to the motherboard.
Every other header and connector is well placed. All are in the vicinity of the devices they will connect to and at or near the edge of the board. The pictures of the build show a clean setup when completed, even with three hard drives, a flash card reader, a DVD burner and all of the case cables in place.
The PCB itself is red, much better than the green that was standard years ago. Whether you like it or not is a matter of taste, I would prefer bright yellow myself, but red is fine. At night with blue LED's it's black.
On the motherboard itself, there are the following headers and connectors:
The rear I/O ports are as follows:
The Northbridge (975X) has a heat sink and a fan and the Southbridge (ICH7R) has a heat sink.
I did some research on the digital PWM feature and discovered that this is pretty hot stuff, well, hot in the respect that is a very state of the art way to control power accurately and more efficiently. So it's hot for as a feature and not so hot to the touch! Apparently, digital power management has been used in server motherboards for a while now because of their reliability, accuracy and efficiency.
Back To Top
Please note that except for the Clear CMOS misprint, these cons are mostly trivial or easily worked around.
See Notes And Comments From Foxconn Technical Support for a further discussion of these Cons and information from a Foxconn technical support person.
Update Jul 23, 2007: The clear CMOS error in the manual may be fixed by now. If in doubt, pull out the magnifying glass and use the clear CMOS settings on the motherboard.
Back To Top
It is not a good idea when building a PC to make mistakes putting components and cables onto a motherboard. If you are lucky, your mistakes will be non-critical and you can correct them. If you are not so fortunate, you can fry expensive parts including the processor and motherboard. In the cause of helping others I will tell you about two stupid things I did during this build.
The first problem I had was installing the silly pushpin design on the Intel fan / heat sink combination. Two of the nylon prongs slipped in easily. The other two were problems, and one I could not get in at all. There were some casualties. The nylon prongs were bent, the skin on my fingers was irritated, and I was very irritated, at myself, for being so stupid!
It is a less than preferable design, but you do need to know several points when installing or removing this contraption. The pushpins have an arrow on them. When installing or removing the heat sink / fan, the pushpins must be turned clockwise with your fingers or with a regular screwdriver so that the arrow is not pointing toward the heat sink. Be careful if you use the screwdriver. It can slip and damage the motherboard, so do not put undue pressure on the pushpin. The pushpin is really a push-pull-pin design. The pushpins must be completely pulled out before trying to set the heat sink onto the motherboard. You have to be careful that both of the nylon prongs are lined up with each of the holes in the motherboard before pushing down on the heat sink. You should hear a click as each prong is set in place. When all prongs are in place, it is best to pull the motherboard and verify that the clip part of the nylon prong has cleared the motherboard and locked in place. Next, push the pushpins down fully and turn counterclockwise until the arrows on each pushpin is pointed toward the heat sink. Improper installation of the heat sink / fan can lead to processor failure, so it is important to get this right.
After being frustrated with getting only three out of the four pushpins in place, I decided to finish a minimal install and see what the CPU core temperature values were, maybe not the smartest thing to do, but the Core 2 Duos were supposed to run at lower power and I was impatient to get the system running. It was revealing though. I immediately went to the PC Health section of the BIOS. The temperatures rose through the 60� C range, and when the 70� temperature was reached, discretion rose to the fore and I wisely turned the system off. I then removed the heat sink and in so doing, realized where I had made my mistake. One of the black pushpins was in the down position, fully extended into the prongs. Take my word for it, you can't install it that way! I pulled all of the black pins fully out, bent the bent prongs back into place and reseated the heat sink, pushed the pins down and turned them counterclockwise into place. Core CPU temperatures are reported at 42-45� C at idle in the BIOS. Not great, but a lot better than 70� C for sure!
The second mistake I made was trying to put my Hiro modem card into a PCI slot. I had left the silly, not very functional slot closure thingy (the technical term for it) of the Cooler Master Mystique closed over the slot brackets. That was easily fixed.
Update Aug 16, 2007: For a long discussion about my third mistake, adding two gigabytes of OCZ memory and how I was able to get it changed from 533 MHz to 800 MHz see Adding Two GB of OCZ Platinum 4-5-4-15 Rev. 1 SDRAM. You will also find a discussion there about how not to flash your BIOS.
Motherboard Layout and Overview
PROS
CONS
Lessons Learned OR Stupid, Stupid, Stupid
| CPU Clock Value | DRAM Voltage Select | CPU Clock | DRAM Clock | Results | Image |
|---|---|---|---|---|---|
| 315 | +.30 V | 2.51 | 787 | Reset stable and system stable, system will soft boot and reset. Power down sometimes needed for Windows restart. | 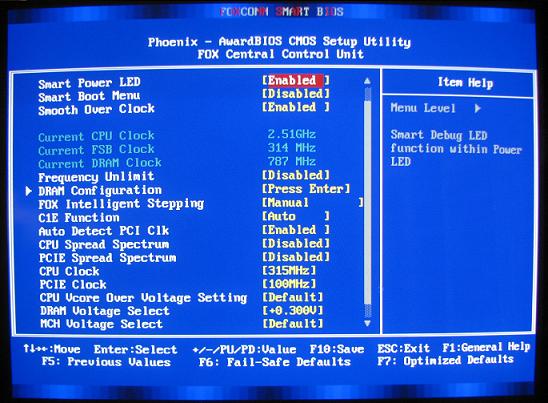 |
| 320 | +.35 V | 2.55 | 799 | Power down sometimes needed to POST, no soft boot and reset. | 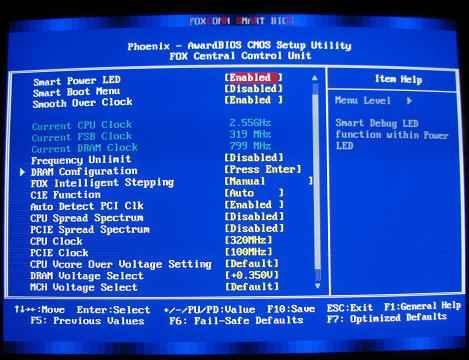 |
| 325 | +.40 V | 2.60 | 814 | POST not stable. Power off at PSU then immediate power on at front panel may be needed. | 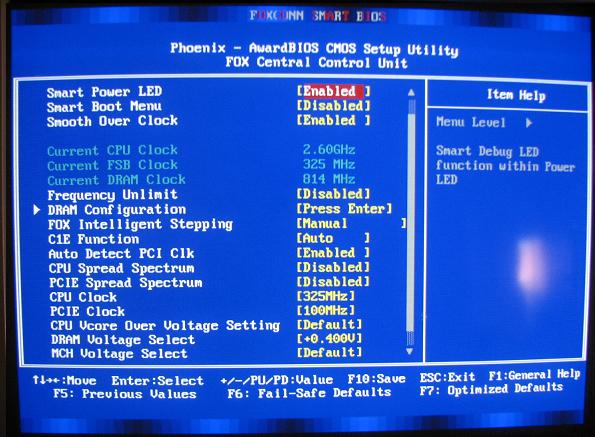 |
I used the middle setup for a while, but switched to the first setup since I was having too much trouble trying to POST. Interestingly, all three settings are very stable in Windows. Overclocking changed the POST behavior. The computer usually takes the initial start and two automatic resets before POSTing. The first POST does not show the POST screen. A reset occurs next. The computer may then POST correctly, but usually shows part of the POST screen and resets again. The third time is the charm, the computer POSTs correctly with the final message being SPI Flash ROM. I won't even try to guess what the BIOS is doing.
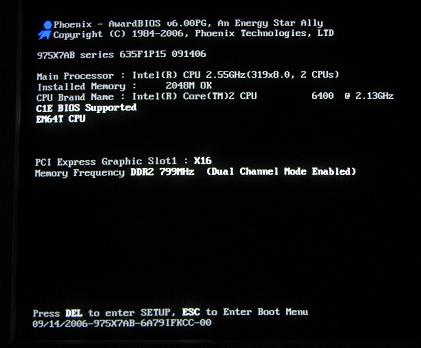
What is most curious is that the DRAM frequency in the POST screen does not match the value in the Fox One Application. In addition, the multiplier, which I have no control of in the BIOS, shows 8.0 in the POST screen and 8.5 in Fox One. What is going on here? Which is correct? The CPU frequency times the multiplier of 319 * 8 = 2552, or 2.552 GHz, so I trust the POST screen values rather than the Fox One values. If this is correct, the DRAM frequency is not 1019, but 799. Below, you can see the BIOS DRAM settings I am using and the POST screen and Fox One Application values based on the middle setup in the table:
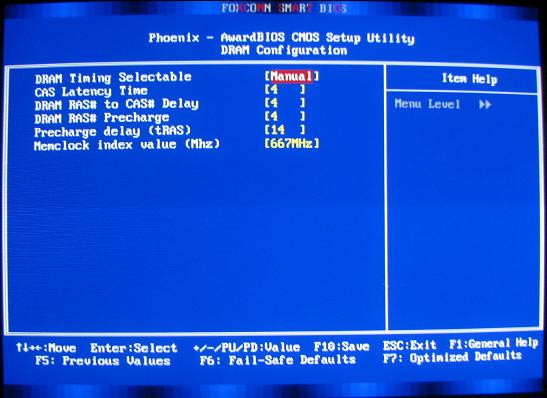
Fox One Settings in BIOS
POST Screen Showing 2.55 GHz CPU Speed, 8.0 multiplier and 799 MHz Memory Speed
Fox One Window Application Showing 2.55 GHz CPU Speed, 8.5 multiplier and 1019 MHz Memory Speed
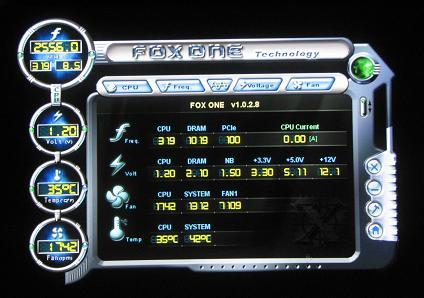
Note that the Fox One Windows App shows the DRAM voltage at 2.10 volts, exactly where it should be with the DRAM voltage set to +.35 V. I am currently using the top setting in the table with the voltage set at +.30 V and the system is stable.
Update Dec 13, 2008: The 635F1P30 version of the BIOS I am now using allows you to change the multiplier settings in the BIOS.
When trying to run the Live Update utility (prior to the new memory), I get this message:
Your system was booted from the backup BIOS! You need to download the BIOS file and DOS flash utility manually then flash the primary BIOS under DOS environment.
That is most interesting since I didn't know I had a backup BIOS! I know that the Gigabyte DQ6 I was looking at had two physically distinct BIOS chips, but there is only one on the Foxconn, or at least so I thought.
Update Dec 7, 2006: One of the sticks of OCZ RAM tested bad in Vista RC1 memtest. I RMA'ed it for a replacement and received it three days short of four weeks. That included the three day UPS and the two day Fedex shipping time. I wasn't pushy about the length of time it was taking for the RMA. I was more concerned that I would get the latest and best memory that would work and apparently that is exactly what I got. The new RAM has the same timings and speed, but the results when I plugged them in was certainly not the same. I had left the DRAM voltage to default (1.8 Volts) and the DRAM timings to By SPD. When the PC booted, the memory showed as 800 MHz and the computer did not reboot at all. Apparently, whatever issues there were with the OCZ RAM have been fixed with the latest memory. The Fox One application shows the DRAM voltage as 2.06 which is curious. The default DRAM voltage with the new memory is recognized by the BIOS as 2.1 Volts. You don't want to or should you change the DRAM voltage to +.30 Volts as I had to do with the older OCZ Platinum DDR2 800 RAM.
I attempted to do some minimal overclocking without much success at all. When trying to change the DRAM timings manually to 4-5-4-15 and 800 MHz, the system would not boot. I could do some minimal overclocking when leaving the DRAM timings to By SPD. Not being much of an overclocker, I am happy enough that the memory shows 800 MHz, though I wonder what the timings really are if I cannot set them manually.
With the older RAM, the computer was running on the backup BIOS. The primary BIOS is now used with the new RAM. Knock on wood, but I couldn't be more satisfied with the OCZ RAM and the OCZ support.
Back To Top
I ordered a Maxtor 250 GB 1.5 GB/sec SATAI hard drive and realized an hour later, I needed a second drive since I wanted to try out RAID. I quickly called Newegg to get a special order added to my original order, but they couldn't add it because it was already packed. It is not very often you want to complain about your online store being too fast. For the extra six bucks for shipping, I went ahead a bought the second drive anyway, and I'm really glad that I did.
I knew nothing about RAID, except that it was a transparent way to backup your data. I spent some time on the internet trying to get some information and I found some good information about the different flavors of RAID, but no information about how to actually implement it and the issues involved with a desktop PC. I will tell you my experiences, but being new to this, you may want to take my insight with some healthy skepticism.
RAID comes in 0, 1, 5 and 10 flavors. I won't discuss 5 and 10 since for almost all desktops, this is far too expensive to implement and is way beyond the needs of most users.
RAID 0, 1 and Intel Matrix RAID are very interesting and well within the budget of most users.
First, I have to describe the two primary RAID implementations, striping and mirroring. This table outlines the highlights of RAID:
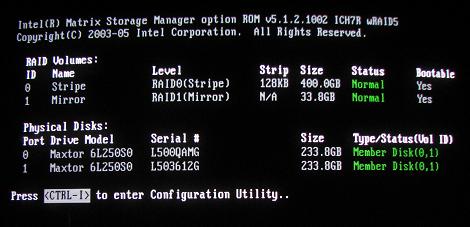
The RAID POST Screen
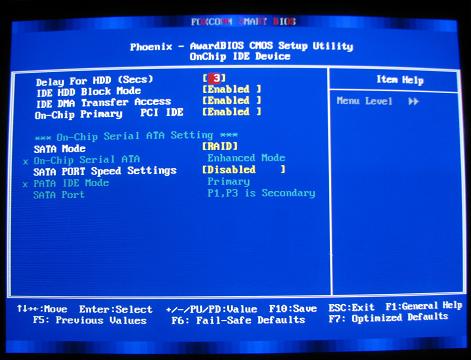
I went with a 400 GB striped volume and a 33.4 GB mirrored volume. I wanted to maximize my storage space and I don't have a lot of essential data, although if I were to do it again, I would increase the mirrored volume size.
The actual installation was surprisingly easy, even though I was flying blind. I only knew that you needed to set up the RAID in the BIOS and copy the appropriate (32 or 64 bit) drivers to a floppy for use with your Windows install.
To set up all of the RAID types listed in the table except RAID 10 you will need two hard drives with the same size, and best if the same model. You should back-up all of your data on both drives since all data will be lost when you configure the drives as RAID. You will need to follow the following steps:
The drivers are needed by the Windows setup in order to see the RAID volumes so you can set up or choose the partition to install Windows.
At this point it is a good idea to check to see if you have the latest drivers on your CD ROM by comparing the versions at the Intel download site. Download the executable if it will install newer drivers.
The Vista Beta 2 performance rating of the 2 x Maxtor DiamondMax 10 250 GB ATA Hard Drives model 6L250S0 is 3.8 and with a 400/33 GB Stripe/mirror RAID implementation, the Vista RC1 Performance Rating rises to an almost unbelievable and totally awesome 5.9 rating!
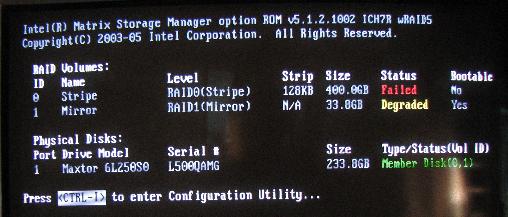
Update Jun 11, 2007: I have now experienced the downside to RAID and want to share my experiences here. I had disaster strike in April 2007. One of my two RAID drives was a refurbished drive and failed without warning. I do NOT recommend using a refurbished drive in any RAID array. I ended up with one after ordering an 'Open Box' item from Newegg. Apparently the term 'Open Box' can also mean 'Refurbished' - be careful! See A Case of Maxtaken Identity for the whole story.
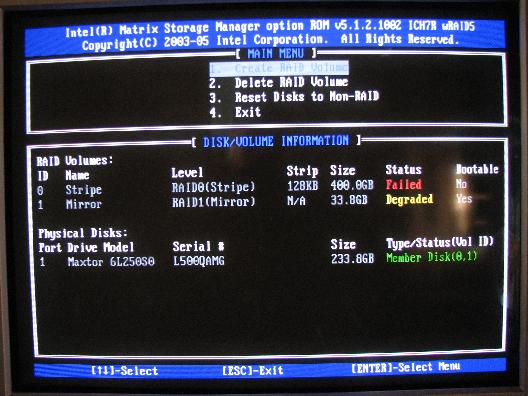
The POST RAID Screen Showing RAID Failure
The Intel Matrix POST Setup Screen Showing RAID Failure
The death of the hard drive allowed me to experience first-hand how to recover from a RAID failure. After much research I decided that another Maxtor 6L250S0 drive was what I needed, although others did not agree with my choice. I stumbled across the fact that the drive was still under warranty. I received my replacement drive, a refurbished unit, and installed it. You will typically receive a refurbished hard drive when replacing a failed drive still under warranty.
Normally all one would have to do at this point is to plug it in, reconfigure the new drive in the Intel Matrix POST setup screen, reinstall Windows and let Windows rebuild the mirrored volume, but I took the opportunity to reconfigure my volumes. I learned from experience that my initial thoughts to maximize my disk space were flawed. I had a very large striped volume, but I just didn't have that much data that I was willing to lose. I backed up all of my data and set up the mirrored and striped volumes so that each had roughly half of the total final volume space. For my two 250 GB drives, this ended up being 150 GB for the striped volume and 158.7 GB for the mirrored volume.
As expected, everything on my striped volume (Vista and my installed apps) was lost. Nothing on the mirrored volume was lost, but I continue to follow a strict backup plan. I have my important files backed up to a third drive and also to DVD. I also export my MS Mail emails to the mirrored volume every week or two. The hard drive failure could have been a disaster, but thanks to my RAID and backup strategy, it was relatively painless to get everything back to normal again.
The downside to RAID? I have found that while writing to a file on a mirrored volume in Vista and a system failure or reboot occurs, the RAID volume may be in a 'Verify' state. When this occurred to me, one of the mirrored drives had to be verified or rebuilt. Vista took forever to start and when it did WIndows Aero was gone. It took over an hour to rebuild the 158.7 GB of hard disk space. I don't know what would have happened if the system shut down while writing to a striped volume, but I suspect it wouldn't be good and I have no desire to find out.
Another downside occurs if you cannot find a matching drive to replace the failed drive. If another Maxtor 250 GB 6L250S0 drive was not available, I would have had to buy two new drives to insure the proper operation of the RAID volumes. Also, if the motherboard were to die, I would have to find another motherboard with the same ICH7R Southbridge chipset in order to access the data on my RAID volumes/drives.
Both of these constraints are acceptable to me. I had a choice to go back to a non-RAID hard disk setup after the hard drive failure but I didn't. I really like using RAID and I can't tell you how happy and relieved I am to have my RAID working again.
Update Aug 16, 2007: I had to pull out my ancient Micron Milennium Pentium II PC and pull the 30 GB Seagate PATA drive out of my new computer and install it in the backup PC. See Adding Two GB of OCZ Platinum 4-5-4-15 Rev 1 SDRAM for the reason why. I had to wipe the drive and resort to installing NT on the hard drive. Since this was my boot drive in the new system, I had figure out how to get my boot loader reinstalled. I have both Vista RC1 and Server 2008 installed on separate partitions on two Maxtor drives configured as RAID 0 and RAID 1.
I have tried to repair my boot drive unsuccessfully in the past. This time I was determined to fix the boot loader without having to reinstall Windows. I found that I had to load the proper Intel AHCI RAID drivers before Windows Startup Repair could successfully fix the boot loader. If you have RAID installed, remember that you will need to do this every time you have to repair Windows startup.
Update Nov 4, 2007: A post to alt.comp.hardware was asking what the advantage was, if any, to having the Intel Matrix Storage Manager installed in Windows. I had been running a beta version of Server 2008 and after the last install forgot to load the Intel Matrix Storage Manager in the OS. I had been running Windows without the Storage Manager and without any problems for several months. So why would I want to install it? I decided to do a little bit of experimenting to find out what those benefits might be.
I have the OS on a striped RAID 0 volume. I downloaded the latest version of the Intel Matrix Storage Manager. It is a good idea to check there for the latest version.
I installed it and simulated a drive failure by unplugging the data cable to one of my SATA drives (don't try this at home - I am a highly trained professional, err rather a beta tester aka high risk taker) and not surprisingly the system locked up when trying to access Explorer. The storage manager did not tell me that one drive was missing from the array. This behavior may be different on a mirrored volume OS install.
So, no benefit there for me having the Storage Manager installed.
I rebooted the computer and noticed that the BIOS RAID screen showed RAID 0 as failed and RAID 1 as degraded. I entered the BIOS RAID configuration screen and there were no options there for me to 'fix' the volume errors.
I then continued to load Windows and got a balloon notification that one of the RAID volumes had errors. First I did a backup of my important data and then I started the Intel Matrix Storage Manager. It took a while for me to figure out how to 'fix' the arrays. I eventually figured out that I could Right Click on the hard drive that had an 'X' next to it and Left Click 'mark as normal'. I knew there had been no data lost (I was doing reads only) so this option should be safe. The missing drive and RAID 0 volume was marked as normal and the RAID 1 volume started the rebuild process.
I need to backtrack for a moment and explain what happens to your system when the RAID manager thinks that there is an error and you *don't* have the Intel Matrix Storage Manager installed in Windows. Anytime you have an abnormal shutdown and disk activity is occurring a subsequent restart of the RAID array will likely result in a rebuild of the RAID 1 mirrored array. While this process is going on, Windows will take about 15 minutes to start. In Vista, when it finally did start, the Aero interface was missing. For my 158 GB RAID 1 array, the rebuild process takes a full hour to complete.
I made the mistake of shutting down the computer during the restart after a BSOD. The next time I started the computer the dreaded mirrored RAID rebuild process started.
With the Storage Manager installed you can initiate this rebuild process from within the storage manager and *not* automatically during Windows startup. This alone is an excellent reason to install the Storage manager.
The storage manager has good information about your drives and RAID arrays. The storage manager also allows you to create a RAID array and a RAID array from an existing drive.
I would highly recommend that you install the Storage Manager in Windows because sooner or later your system will not shut down normally. When that happens you don't want to wait for the array rebuild process to grind on and on and on before you can start using your computer.
Oh yes - one more thing. When I loaded the latest version of the Intel Matrix Storage Manager, Windows told me that I had 3 days to activate due to a hardware change. There was no hardware change, but the good news is that the activation from within Windows worked without having to make that annoying activation call to Microsoft.
Back To Top
This is the section where I am allowed to stray from the facts, give my opinions and feelings, ramble a bit and make speculations and inferences.
I narrowed my choice of motherboards down to a final three:
I sent emails to the technical support people of each manufacturer. They all basically said the same (I believe accurate) information that the motherboard may not be stable with the memory running at 800 MHz and for the 975X boards, the memory was not technically supported by the Intel chip and for the 965, the memory would have to be overclocked and may not be stable. But none of them told me what I was looking for. To their credit, all three were honest and quick with their replies.
The matrix I had built pointed to the Foxconn as the best choice, but I threw that out for a while and considered them separately based on my Internet research. The MSI customers had reported a lot of BIOS problems and the Gigabyte looked promising, but overpriced. I really wanted the DS4 and not the DQ6, but that motherboard was not available in North America as of late September 2006.
The long name of the motherboard ultimately leads one to shorten or nickname the name when referring to it. I call this the Abbie Kersh board. Actually, all of those letters and numbers mean something:
975X7AB-8EKRS2H
The Intel 975X Northbridge chip does not technically support DDR2 800. This means that in order to run any DDR2 800 memory, you are over-specing any 975X motherboard. From my ECS P965T-A webpage:
So who is to blame for all of this memory / motherboard compatibility issues? Newer BIOS releases have improved this problem greatly, but end users are still reporting problems. The retail sites should include any memory voltage requirements with a disclaimer that memory modules requiring more than 1.8 Volts are not technically supported by the Intel 975 chip and that they memory may or may not be supported by the motherboard by overclocking the memory to the manufacturers specs. And they should note that the Intel 965 chip will support DDR2 800 memory, but not all motherboard BIOS default settings will properly recognize the RAM at the 800 MHz speed. The manufacturers should include installation instructions with their memory showing how to generically change the BIOS DIMM voltage settings and end users should be aware that some motherboards without DIMM voltage adjustments in the BIOS simply aren't supported at the 800 MHz speed and that even when the DIMM voltage adjustments are available in the BIOS, compatibility issues still exist and they may be required to flash their BIOS to a newer version or, worst case, to find a new motherboard / memory combination.
I was pleased to see that the MSI, Gigabyte and Foxconn technical support were up front with me about my memory compatibility issues. It wasn't the answer I wanted to hear, but it was the right answer.
I modified the board a bit to show the Foxconn logo on the Northbridge fan correctly. I removed the four screws that hold the logo plate and fan on the Northbridge heat sink. I then rotated the fan 180� so the power cable was closer to the fan header and rotated the logo shield 90� clockwise so the logo was oriented properly. The screws holding the logo shield and fan in place don't fit into a hole, they lightly grip the heat sink ribs, so the assembly is lightly held in place. I could not do the same with the Southbridge. The logo is on the heat sink itself and the way it is secured to the motherboard does not allow it to be turned clockwise the 90� needed for the proper orientation. See View The Foxconn 975X7AB-8EKRS2H Build Page for pictures of the motherboard.
I also took the useless Power LED on the front panel of my case and zip-tied it to the drive bay to illuminate the motherboard. The yellow and green PCIe slots, USB headers and IEEE 1394 header really stand out!
Back To Top
I have offered many manufacturers the opportunity to review my website and clarify or comment on what I have written. A Foxconn tech support person is, so far, the only one who has taken up my offer. I want to personally thank the technical support person at Foxconn who took the time to preview this review and reply with some comments of his own. I will give a synopsis of his comments here, which will hopefully inform others who may have the same questions or issues that I had.
I had originally noted in the Cons that the manual did not have a picture of the motherboard. He informed me that the motherboard comes with a very nice color poster that shows the motherboard and some key header pinouts. I didn't even look at the poster thinking, incorrectly, that is was a short summary or overview of the manual. It is more than that and something that I wish I had taken the time to explore before doing the install.
I had originally thought that there was no way to know which DIMM slot was number one. It is not shown in the manual or the poster and I thought, not shown on the motherboard. I just missed it. It is there, between the CPU Fan header and the leftmost DIMM slot.
In regards to no fan header by the I/O ports, he told me that they recommend that all 'high draw' fans connect directly to the power supply and not the motherboard. I happen to be lucky enough to have two four-pin Molex to fan connector adapter/converters that I could use to connect directly to the power supply. Now there is one item that Foxconn can include in their accessory pack if they don't want users to connect case fans to the motherboard. If you do use this method and have sensors on the fans, you will of course lose the ability to monitor their speed. The whole issue got me to wondering if I could improve my overclocking stability by moving the two 120 mm fans off the motherboard headers. After moving both fan connectors directly to the power supply I could see no change in the POST stability when trying the middle and bottom overclocking options.
As for the BIOS backup issue, quoted from Foxconn technical support:
Back To Top
I am very happy with this motherboard. The BIOS was by far the most stable I have used of the three motherboards I have used and reviewed on this website. This makes it highly recommended for a first time PC builder.
I would definitely classify this as an upper end motherboard and I would expect most so-called enthusiasts to be very happy with it. Extreme overclockers may be disappointed based on some of the comments I have read on the internet forums, but I have tried to do only limited overclocking myself since I am not experienced enough to be playing around with voltages other than the +3.0 Volts needed for the OCZ DRAM. With a Northbridge fan and good case cooling with the Cooler Master Mystique, this board is almost screaming 'overclock me!' I am happy enough with the overclocking I have gotten and might try changing the voltages later, but only for the educational value.
Except for the stupid things I did during the setup and install and the clear CMOS misinformation in the manual, this install went without a hitch. That is somewhat surprising considering that I am still learning the hardware side of computers, my previous experience with new setups and the immature nature of the Conroe motherboards. I expected a lot of pain and problems during the install, but most of the pain I experienced was self-inflicted! It went so well in fact that I am still somewhat surprised by the whole experience and wondering 'what did I miss?'
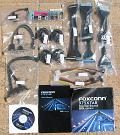
There is no skimping on the accessories either. There were so many accessories that I had to pull the camera back to get them all in the picture. There may be, in fact, too many accessories, if that is possible. For instance, there are two PCI slot brackets, one for two IEEE 1394 Firewire ports and one for four USB ports. With my two case and two flash card reader USB cables installed, there are no more USB headers available on the motherboard. The same goes for the IEEE 1394 firewire headers. The only internal header is taken by the case port and even if it wasn't, only one of the two 1394 ports on the bracket could be enabled. Obviously, more USB and 1394 headers would solve this problem, but that is all that is supported by the 975X / ICH7R chipset and it isn't an issue for me. It is just a little bit of overkill on the accessory side since most cases come with USB and IEEE 1394 ports. The accessory package also included a not so typical solid color-coded I/O shield. I really like that. It has been a pet peeve of mine to replace a nice solid I/O shield that came with the case with a flimsy one that came with the motherboard. I appreciate it when attention is paid to details.
Another nice detail is the SATA connectors. Both the power and data connectors have a 90� bend in them on one end, the drive end. This is perfect for me since the Mystique case has, unfortunately, the drive bay oriented so that the connectors sit flush against the clear side panel. The Foxconn connectors give me a little additional clearance so that the connectors do not actually touch the side window.
The system I put together generates surprisingly little heat. The Rosewill 600 watt >80% efficiency power supply, the low power usage of the Intel Core 2 Duo processor and the digital power management of the Foxconn motherboard complement each other very well. Less heat and power consumption are perfect for me; I use the computer on average eight plus hours daily. I like the idea of low power bills and less heat - heat being the destroyer of electrical components. I plan to keep this PC for at least five years, and with some luck, all of these original components will still be hard at work in 2011.
Who should buy this board?
This system is quiet. It's a good motherboard feature / price-wise. It has a lot of state of the art features. This board should gain popularity among the large users in the middle ground. Foxconn has a real winner here, now the question is whether or not the word will get out.
If you have installed a motherboard before or really know your way around the BIOS and are using new components, you shouldn't have many problems. Even if you have a below average knowledge of BIOS settings, the install should go smoothly since the default settings seem to be really good. Take your time and follow the instructions in the manual and look on-line for installation help if this is your first build.
Who shouldn't buy this board?
If you are on a budget, you may find the price a little bit much, but certainly in line with similar Core 2 Duo motherboards. Demand is high at the time of this writing and I would expect the price to fall sometime in 2007. Extreme overclockers will probably be disappointed with the BIOS settings; there is no multiplier control.
Update Jan 3, 2007: The lower fan in the PSU spins slowly and sticks. The DVD burner makes a grinding/scraping noise when the computer starts up, but seems to be working fine other than that and the keyboard has a [CTRL] key that you have to press very hard to engage. See My System for a link to detailed reviews of my system components. None of these problems are big enough to spend the time or money to return them, but they are more than just annoying for the good money spent on them. One stick of memory went bad and was replaced with my cost being only the shipping and time waiting for the replacement. The motherboard is still going strong. With the new memory, it no longer reboots during POST and I don't need to overclock it to have the RAM show as 800 MHz, though I am somewhat concerned that may not be accurate since the P17 version of the BIOS fixes an issue with 667 MHz memory showing as 800 MHz. I'm waiting for the next Rev of the BIOS before I flash the BIOS. I would like to sell the computer and build another, but I can't expect to sell it with these problems. On further contemplation, I no longer think of this motherboard as somewhat pricey at all considering the top notch support and accessories that came with it and the solid performer it has been so far.
Update Jul 23, 2007: I owe Rosewill an apology. I finally decided to pull the Rosewill power supply and return it for a replacement. To my surprise, the 80 mm LED fan in the bottom of the power supply that wasn't spinning at all during the winter is working at full speed now. The PSU has a temperature sensor that automatically slows down the bottom fan when the temperature is low. It's been great performer.
The motherboard is still going strong. There was the slightest hint of some noise in the 40 mm Northbridge fan during the winter. That too has gone away. I plan to buy a spare to have on hand. It's a fact of life. Fans die or start making noise. I much prefer to have the fan there than not, though a heat-pipe solution would be preferable. This fan spins much faster than 80 and 120 mm fans and is noisier, though not excessive. During high demand this summer it has occasionally sped up to provide instant cooling. This occurs infrequently and my room temperature is high (I live in a desert with no AC). When speeding up the fan can be quite noisy. It sounds a little bit like a jet engine starting up. It isn't really a problem even in my 85 to 90� room temperatures.
The Lite-On DVD burner suddenly died while watching a DVD. It runs very hot and with my room temperatures, I thought I had fried a component on the PCB board. The drive was not recognized during POST and the Seagate hard drive that was on the same PATA channel also failed to be recognized. I pulled the burner and moved the jumper to master and placed it on the second PATA channel with a different cable. After turning on the JMicron IDE channel in the BIOS and rebooting, the DVD burner was recognized. I put the jumper back to slave and put the burner back on the 18" Link Depot IDE cable. The problem returned. I replaced the IDE cable with one of the high quality Foxconn IDE cables that came with the motherboard. The burner was recognized again, so it was a simple cable problem.
The replacement refurbished Maxtor drive has died after only a few years. Based on my experience I would recommend that you avoid refurbished hard drives.
Want Speed And Data Safety? Consider RAID
RAID Type
Drives Needed (min)
Strategy
Advantages
Disadvantages
Implementation
0
2
Speed, Maximize Storage Space
Allows data to be stored and accessed or striped across two drives. Faster read and write speeds.
Your risk of data loss is essentially double that of a single drive implementation and, like a single drive implementation, there is no data backup. Data loss occurs when a drive fails. With two drives, that risk increases nearly times two.
Store data on a striped drive that you want fast access speeds (the OS is a perfect example of this). Any programs or data that can be easily reloaded, downloaded, replaced, retrieved or restored is a good candidate for a striped volume. You can also consider any data that is easily recreated or you don't mind it if you lose it.
1
2
Speed For Reads, Data Safety
Allows data to be duplicated or mirrored across two drives. Both drives appear to be one large drive to your system. Read speeds are faster.
Essentially reduces your effective volume size to 1/2. Since your data is stored physically twice, a 500 MB has only 250 MB of effective storage. You get some performance increase for reading files only.
If a drive fails, you can be up and running in a very short time. Since all data is duplicated, in theory, nothing should be lost.
10
4
Speed and Data Safety
Provides good performance and data safety.
Requires four drives, too expensive for most desktop users. It may be overkill for most users. Not all motherboards will support four drives, IDE or SATA, though you should go with SATA if possible.
All essential data that you don't want to lose should go here. Examples would be any home movies or pictures, emails, IM chats you want to keep, personal spreadsheets, text files, Word documents and personal databases are all candidates for a mirrored volume.
Intel Matrix
2
Speed, Maximize Storage Space and Data Safety
Allows data to be accessed or striped across two drives and duplicated or mirrored across the same two drives.
The effective storage size for the RAID 1 volume is 1/2 the space remaining to be allocated. Example: You have 233.4 GB x 2 to allocate (466.8 GB total). You set up volume 0 as striped with 300 GB allocated. That leaves 166.8 GB to allocate. Volume 1 is set up as mirrored with 166.8 GB allocated with an effective storage size of 83.4 GB (166.8 divided by two).
The best of both worlds. You can implement RAID 0 and RAID 1 with only two drives. All non-essential data that you don't mind losing should go on the striped volume. All essential data that you don't want to lose should go on the mirrored volume.
Editorial Privilege
MSI P975X Platinum
Foxconn 975X7AB-8EKRS2H
GIGABYTE GA-965P-DQ6
Notes And Comments From Foxconn Technical Support
"...there are two (2) BIOS on the board. The one you noted is the FWH (firmware hub) - in the socket. The other is the SPI (Serial Peripheral Interface) flash chip. Actually you can remove the FWH (power removed), reapply power, and boot up and run just fine off the SPI chip. The SPI chip is located to the right (North) of DIMM #3."
Conclusions

My System
Vista RC1 Performance Rating 4.7
Purchased Aug - Sep 2006
| ID | Component | Details | Pics | Reviews |
|---|---|---|---|---|
| 1 | Foxconn 975X7AB-8EKRS2H (V1.0) Socket T (LGA 775) Intel P975X ATX Intel Motherboard | eWiz | 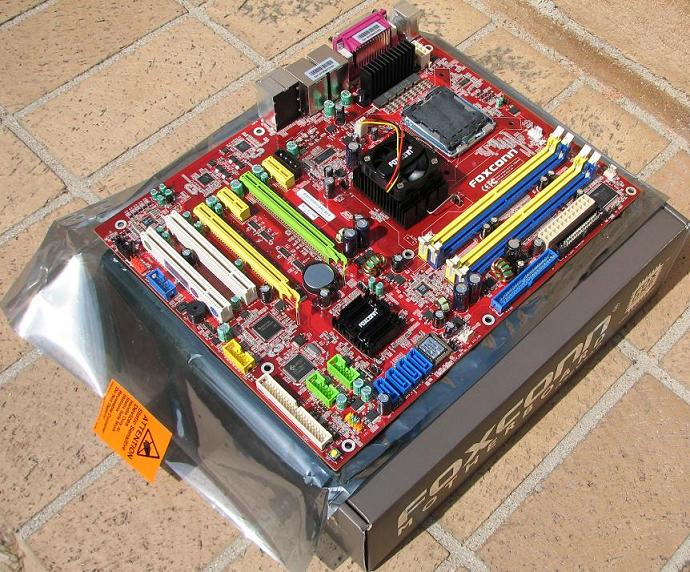 |
My Review |
| 2 | Intel Core 2 Duo E6400 Conroe 2.13GHz LGA 775 Processor Model BX80557E6400 | Newegg | 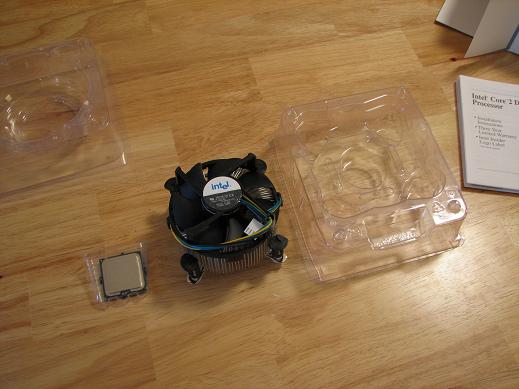 |
My Review |
| 3 | OCZ Platinum 2GB (2 x 1GB) 240-Pin DDR2 SDRAM DDR2 800 (PC2 6400) Unbuffered Dual Channel Kit System Memory Model OCZ2P8002GK CAS Latency 4 timing 4-5-4-15 | Newegg | 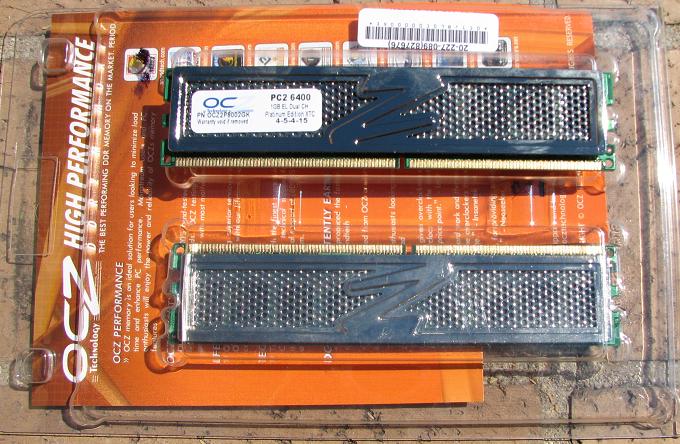 |
My Review |
| 4 | eVGA 256-P2-N549-TR Geforce 7600GS 256MB GDDR2 PCI Express x16 Video Card | Newegg | 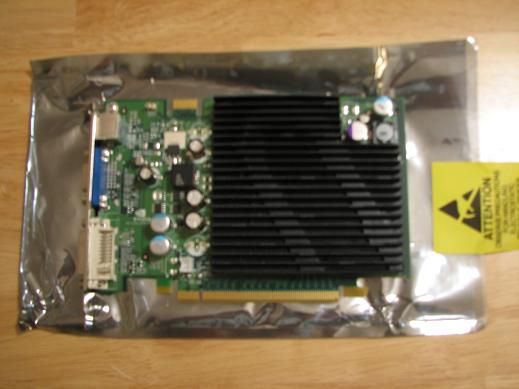 |
My Review |
| 5 | 2 x Maxtor DiamondMax 10 6L250S0 250GB 7200 RPM Serial ATA150 Hard Drive - OEM | Maxtor | 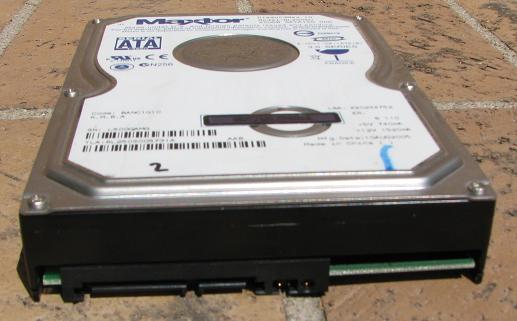 |
My Review - And Thank You Maxtor! |
| 6 | Seagate Barracuda 30GB ATA Hard Drive ST330013A | Seagate Specs | 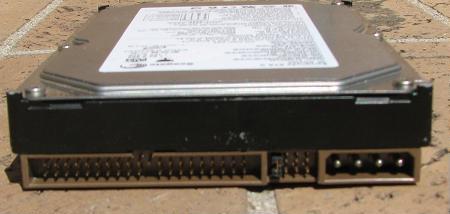 |
|
| 7 | LITE-ON 16X DVD�R DVD Burner W/ LightScribe and 5X DVD-RAM Write Black ATAPI/E-IDE Model SHM-165H6S Burner with Software | Newegg | 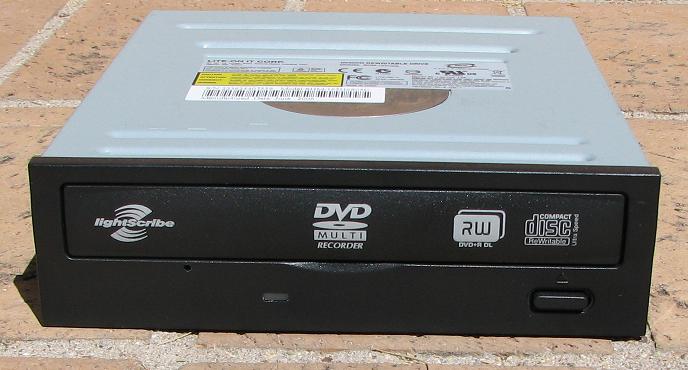 |
My Review |
| 8 | Rosewill RCR-100 USB 2.0 Card Reader | Newegg | 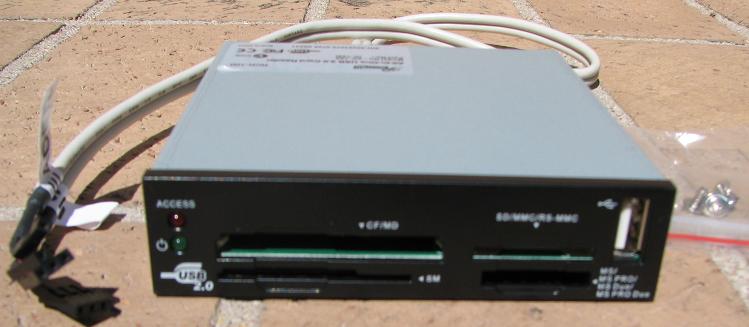 |
My Review |
| 9 | Hiro 56K V.92 PCI Modem S/W W/O Voice Intel 537EP Chip 56 KBs Modem (For XP Pro x64) | Tiger Direct | 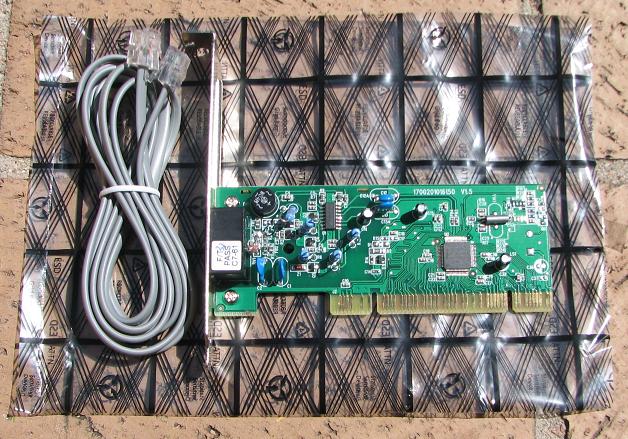
| My Review |
| 10 | COOLER MASTER Mystique 631 RC-631-KWN1-GP Black Aluminum ATX Mid Tower Computer Case | Newegg | 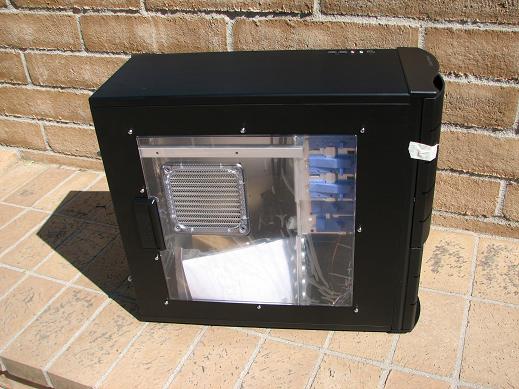 |
My Review |
| 11 | Rosewill RD600-2DC-SL ATX Form Factor 12V V2.2 / SSI standard EPS 12V 600W Active PFC Power Supply - SLI Ready | Newegg | 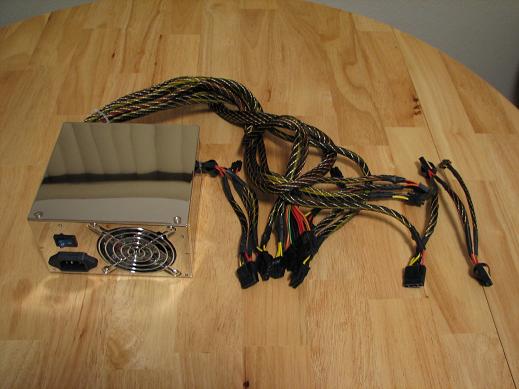 |
My Review |
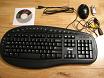
| 12 | Rosewill RM1830 BLK Black 3 Buttons 800DPI USB RF Optical Wireless Mouse | Newegg |  |
My Review |
| 13 | Rosewill RK-680 BK Black USB Wired Standard Keyboard | Newegg | My Review |
| Pecos SoftWareWorks Home | Contact Me | Terms of Use Rev 09/30/10 | Privacy Policy Rev 05/20/09 | About Us | Site Map |
| Tweet |
|
||
|
© Copyright 2007-2015 Alan Norton None of the content may be used or reproduced without written authorization from Alan Norton. |
|||
