Custom Search
|

|
|---|
|
|
|---|
|
|
|---|
|
Custom Search
|
|
|---|
Recommended for developers:

![]()
Lesser Goldfinch family preening
![]()
LCD Vs. CRT - Do LCDs finally match CRTs in picture quality?
ECS P965T-A Motherboard
ABIT AN8 SLI Motherboard
Foxconn 975X7AB-8EKRS2H Motherboard
Foxconn BlackOps Motherboard
![]()
My misadventures flying with Allegiant Air
![]()
The Missing Post Mystery
A post I made to a Vista newsgroup was missing from the Outlook newsreader
Where did it go?
The Missing Post Mystery Revisited
It happened again! A post I made to a Vista newsgroup was missing from the Vista Mail newsreader
Where did it go?
A Case of Maxtaken Identity
When is a hard drive not a hard drive? Find out when!
![]()
Changes to the Windows 7 Taskbar You Should Know About
Vista Image Capture 'Slipstream' SP1 and SP2 into a single Vista install disc
Detailed Instructions for Reverse Integrating SP1 and SP2 into Vista
What is RAID? Some RAID Basics
RAID 5 on a Desktop PC
How to Personalize Windows Vista
Develop and Implement a Personal Backup Plan
Ten things you can do to create better documentation
(Tech Republic)
Flash Your BIOS
Three Good Reasons for Flashing Your BIOS
Ten common mistakes you should avoid when flashing your BIOS
(Tech Republic)
Find a new dial-up ISP
Sign up for 10 free hours of NetZero access!
Create a Shutdown/Sleep/Restart or Continue Icon For the Vista Desktop
What is a computer guy doing with home remodeling projects on his Website?
The Upscale Utility Room Remodel with Catch Basin and Wraparound Ceramic Tile Wall
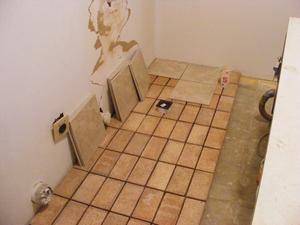
The Bathroom Remodel for Under $1000 Project
The Do It Yourself Bedroom Engineered Prefinished Red Oak Wood Flooring Installation From Hell
Bedroom Remodel With Wood Parquet Flooring
Use Comodo Internet Security 4.0 to Lock Down Your PC Following a Windows Install or Reinstall
![]()
The Northstar Horizon Microcomputer
![]()
Round-Tailed Ground Squirrels

Prairie Dogs

American Kestrel Falcons "Sparrow Hawk"

Arizona Sonoran Desert

Arizona Sunsets

Cienega Creek

Trains In the Desert

Desert and Mountain Flowers

Fox Squirrels

![]()
The Other Reason Why Your Irrigation Valve Might be Leaking
My Response to the Newegg Affiliates Program Changes
Playing the Rebate Game
Know the Rules Before You Play
Vista Confusion
The four questions you need to ask before buying Vista
I realized from the beginning that putting ceramic tile on a wall presented some unique challenges. The biggest challenge was cutting the ceramic tile to fit around the plumbing and electric fixtures. Cutting a square or hole in the middle of a ceramic tile without the proper very expensive tools is difficult at best. Without these tools it was close to impossible. I decided that I needed to engineer the wall to minimize the number of cuts that would have to be made in the middle of a tile. That meant that I needed as many cuts as possible to be on the edges of the 12 inch tiles. The problem was that I had seven vents, drains, electrical outlets and plumbing fixtures to line up to the edge of the tiles.
I considered several ways to lay the tile out to arrange them in a way so that the edges intersected with the seven fixtures and outlets. I tried physically attaching them to the wall with tape, but that was a bad idea. You couldn't go more than a couple of rows high before the weight caused problems. Laying out tile on a wall is not a simple matter like laying them out on a floor. The pattern I was using was complex enough that I needed a much better way to lay out the tile.
I thought about cutting out 12x12 inch and 2x2 inch pieces of cardboard and taping those to the wall. Even that idea was unwieldy in practice. It was just too difficult to physically tape them to the wall and then remove them to adjust the pattern.
I considered using a large sheet of tracing paper and tracing the outline of the individual tiles of the floor already in place. That seemed like a good solution but I didn't have any tracing paper and I didn't even know if you can find tracing paper large enough to cover a four by six foot section of a wall. In addition there was the issue of moving the paper over the pipes, vents and fixtures some that extended three inches out from the wall.
Then it occurred to me that I had the perfect tools to easily lay out the pattern. I could use my digital camera, computer and image software to do exactly what I needed. I already owned a copy of LView Pro 2006 x64 that I could use to create a pattern over a digital image. With a mouse click I could move the pattern around over an image of the wall. It worked like a dream but it wasn't quite as simple as it appeared.
I mentally divided the wall into four sections. In the bottom two sections I placed a 12x12 inch tile on the floor next to the wall. I taped a 2x2 inch tile next to it with a 3/16 inch spacer in between the two tiles. I traced both tiles onto the wall in each of the other two sections.
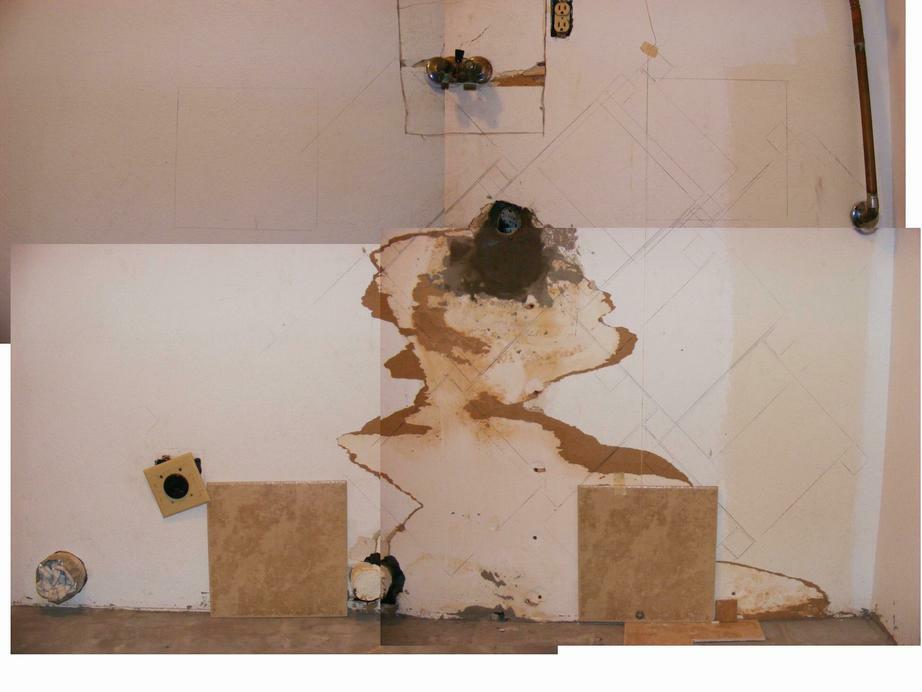
I then took an image of each of the four quadrants of the wall and loaded them into LView. I started with one picture and resized it so it would fit on the screen. Then I had to resize the remaining three pictures to ensure that the tiles were all the same size in all four pictures. I moved the four pictures so they overlapped. I ended up with a composite image that I saved to a file.
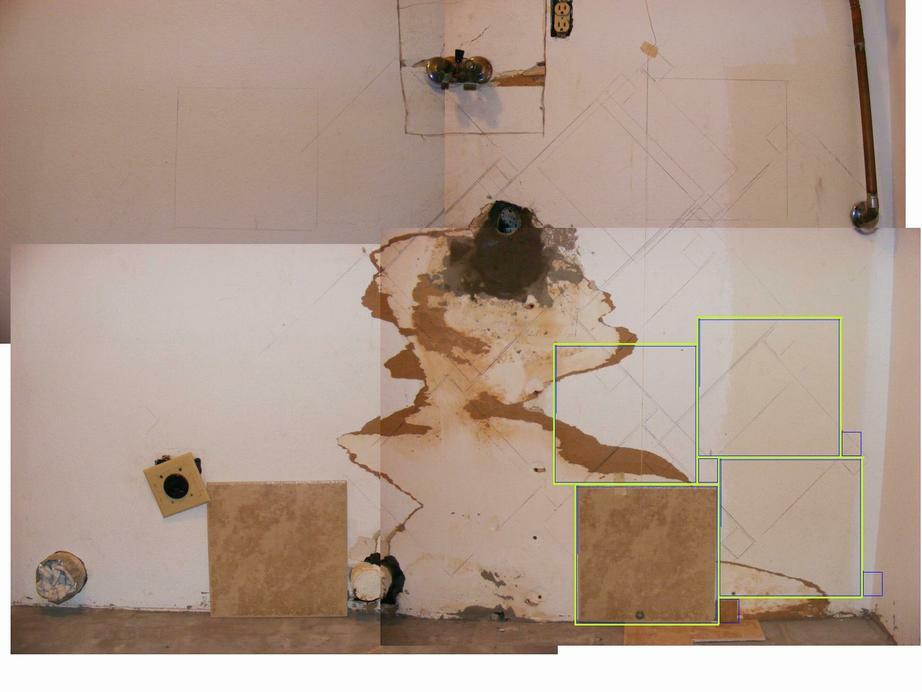
I started adding blue lines around the tile edge. I added a larger yellow line around the tiles that represented the 3/16 inch grout lines. I merged the lines creating an object. I could copy and paste the base pattern creating first four sets of tiles. Each time I made a major change to the image I saved it as a new file name.
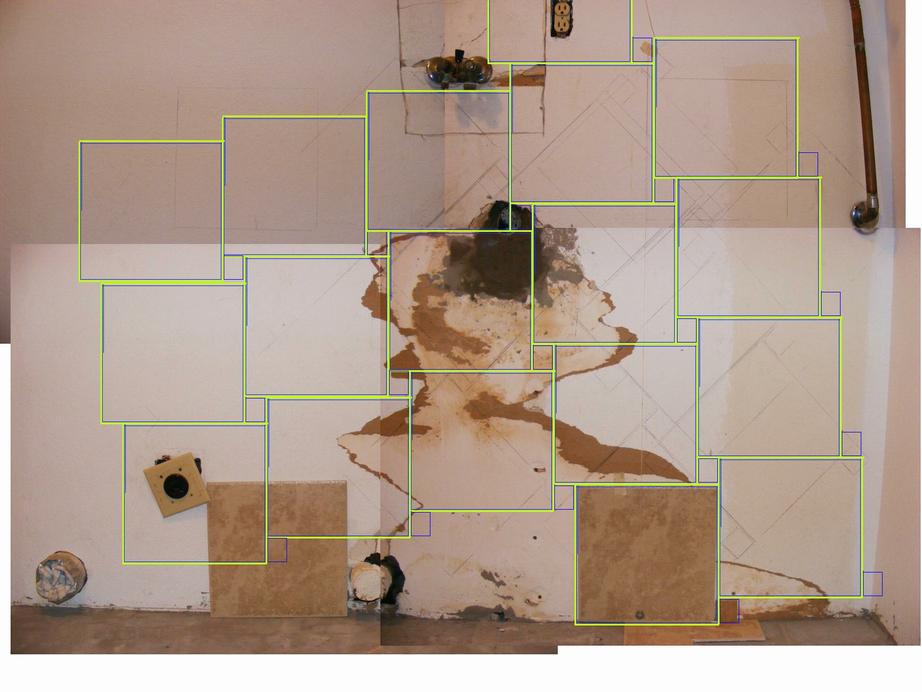
I then copy and pasted enough 'virtual' tiles to cover the wall using the imaging software. Each new set of tiles was moved next to the pattern already in place. I then saved the file as a new file name and merged the objects into one object. I now had a template that could be clicked and moved with the mouse. The first task was to move the template over the tiles and tracings in the pictures to verify that the template was accurate. It was.
Now it was a simple process to move the template so that as many as possible fixtures and outlets sat under or next to one of the lines that represented a tile edge. The amazing discovery was that I could fit the pattern to six of the seven items and the seventh, the water heater overflow pipe, was only about a half of an inch from a 12 inch tile edge. That small gap could easily be filled in with grout. The water heater when installed would hide the small gap so it wouldn't be visible.
The whole process took less than two hours to do.
I had the perfect layout. I knew exactly where to place each tile. And to make matters even simpler, one of the tiles sat just above the existing catch basin floor without needing to be cut. This would be the master tile. I could set it in place and then add the remaining tiles to it one by one. As you can see in the picture, the master tile was in the extreme lower right.
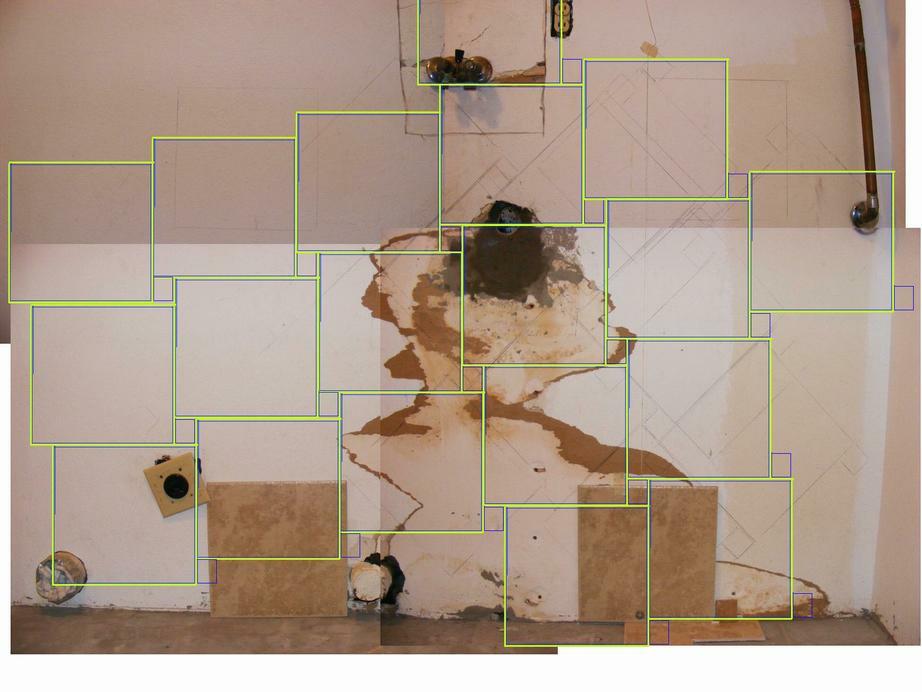
I had one more task that needed to be performed before I could begin cutting tiles. I needed to do a sanity check. As I will soon explain, this was my second attempt at creating a computer generated template and I needed to be confident that the tiles on the far end of the wall would be where they appeared in the computer template.
To do the sanity check I placed the master tile where the computer template said it should go. I then physically placed 12x12 and 2x2 inch tiles on the wall with the appropriate 3/16 inch gap and traced them directly onto the wall. I didn't need to trace the entire pattern this way onto the wall. I just needed to trace to the far left dryer vent and up to the electrical outlet. I found that the computer template was accurate enough to proceed.
I said earlier that this was my second attempt at creating the perfect wall layout. The first attempt was with a diamond pattern using only one JPEG image. Both of these caused problems. The diamond pattern meant that cuts would have to be made with 45° angles. It is difficult to do that using a dry cut diamond blade and a radial arm saw.
Note on using a dry cut diamond blade: Using a dry cut diamond blade for a ceramic tile wall project is not the best choice. A radial arm saw is not designed for cutting ceramic tile. You will almost certainly have to remove the blade guard, increasing the danger of injury. If you do use a radial arm saw to cut ceramic tile, use extreme caution!
A dry cut diamond blade will cause chipping along the cut edge, no matter how careful you are. If the grout you will be using matches the ceramic tile, these chipped edges can be less obvious. If you use a colored grout that is much darker than the tile, the chips will stand out and look quite ugly. A dry cut diamond blade also creates a large dust cloud that you don't want to breathe. You definitely don't want to use a dry cut diamond blade indoors. Even if using outdoors, you should be wearing a dust mask and full face protection.
The composite ceramic tile cutting blades are no better and they wear down quickly. These types of blades should not be used on a radial arm saw without stabilizers. Composite blades can fly apart at the high speeds of a radial arm saw without the stabilizers or if the blade becomes unbalanced or if the blade was manufactured incorrectly. Always wear full face protection when cutting ceramic tile with a power saw.
A dry cut blade is just fine for cutting tile for a ceramic floor if the cuts are for the edge pieces. The chipped edge will be hidden by the baseboards.
What should you use instead of a dry cut diamond blade? If your budget allows it, rent or buy a wet cut ceramic tile saw and blade.
|
|
|
|
|
| Pecos SoftWareWorks Home | Contact Me | Terms of Use Rev 09/30/10 | Privacy Policy Rev 05/20/09 | About Us | Site Map |
| Tweet |
|
||
|
© Copyright 2007-2015 Alan Norton None of the content may be used or reproduced without written authorization from Alan Norton. |
|||